Markdown Ipsum

Pellentesque habitant morbi tristique senectus et netus et malesuada fames ac turpis egestas. Vestibulum tortor quam, feugiat vitae, ultricies eget, tempor sit amet, ante. Donec eu libero sit amet quam egestas semper. Aenean ultricies mi vitae est. Mauris placerat eleifend leo. Quisque sit amet est et sapien ullamcorper pharetra. Vestibulum erat wisi, condimentum sed, commodo vitae, ornare sit amet, wisi. Aenean fermentum, elit eget tincidunt condimentum, eros ipsum rutrum orci, sagittis tempus lacus enim ac dui. Donec non enim in turpis pulvinar facilisis. Ut felis.

123456789012345678901234567890123456789012345678901234567890123456

Header Level 2

The admin role gives full privileges to the collaborator, allowing them to manage and publish all content. This role is great for people who are helping build the site, like a developer or designer, since it allows them to upload theme files, change the site’s settings, and invite other collaborators.1

  1. Lorem ipsum dolor sit amet, consectetuer adipiscing elit.
  2. Aliquam tincidunt mauris eu risus.

Lorem ipsum dolor sit amet, consectetur adipiscing elit. Vivamus magna. Cras in mi at felis aliquet congue. Ut a est eget ligula molestie gravida. Curabitur massa. Donec eleifend, libero at sagittis mollis, tellus est malesuada tellus, at luctus turpis elit sit amet quam. Vivamus pretium ornare est.

Header Level 3

This role is great for people who are helping build the site, like a developer or designer, since it allows them to upload theme files, change the site’s settings, and invite other collaborators.

  • Morbi in sem quis dui placerat ornare. Pellentesque odio nisi, euismod in, pharetra a, ultricies in, diam. Sed arcu. Cras consequat.
  • Praesent dapibus, neque id cursus faucibus, tortor neque egestas augue, eu vulputate magna eros eu erat. Aliquam erat volutpat. Nam dui mi, tincidunt quis, accumsan porttitor, facilisis luctus, metus.
  • Phasellus ultrices nulla quis nibh. Quisque a lectus. Donec consectetuer ligula vulputate sem tristique cursus. Nam nulla quam, gravida non, commodo a, sodales sit amet, nisi.
  • Pellentesque fermentum dolor. Aliquam quam lectus, facilisis auctor, ultrices ut, elementum vulputate, nunc.

Header Level 4

You can group by any property like date, title, slug, even metadata and taxonomy. Here are a few real-world examples you may want to apply to your theme.

#header h1 a {
  display: block;
  width: 300px;
  height: 80px;
}
Header Level 5

For the last week publishing in the Siteleaf interface has been powered by our API. This has been a requested feature by some of our users and ourselves. Its behavior is bit different than some of our other API endpoints, so let’s go over it.

Header Level 6

Pellentesque habitant morbi tristique senectus et netus et malesuada fames ac turpis egestas. Vestibulum tortor quam, feugiat vitae, ultricies eget, tempor sit amet, ante. Donec eu libero sit amet quam egestas semper. Aenean ultricies mi vitae est. Mauris placerat eleifend leo. Quisque sit amet est et sapien ullamcorper pharetra. Vestibulum erat wisi, condimentum sed, commodo vitae, ornare sit amet, wisi. Aenean fermentum, elit eget tincidunt condimentum, eros ipsum rutrum orci, sagittis tempus lacus enim ac dui. Donec non enim in turpis pulvinar facilisis. Ut felis.


Query String Params

Name Type Desc
domain String Retrieves collections of the account matching this dashboard domain
include Array Additional objects available to include in response: items, users
owned Boolean Filters collections to those owned by current user
owner_id Integer Filters collections to those owned by this user
page Integer Current page
per_page Integer Number of collections to return
q String Filters collections to those matching this search query
sort String Supported values: name, recent
status Array Supported collection statuses: active (default), archived, highlighted

Archive page

Grouping posts by year is a common pattern on archive pages. Since Siteleaf already generates archive pages for us, we can easily sprinkle in group_by and have a beautiful blog archive in minutes.

TO DO: remove this post. First, let’s group our posts by year:

{% assign posts_by_year = posts | group_by:"year" %}

Note: We are using posts in this case rather than site.posts because we only want posts relative to this page (but either could work).

Now we can display our grouped posts:

{% for year in posts_by_year %}
  <h2>{{year.name}}</h2>
  <ul>
  {% for post in year.items %}
    <li><a href="{{post.url}}">{{post.title}}</a></li>
  {% endfor %}
  </ul>
{% endfor %}

In case you’re wondering, %B gives us the month name (e.g. “April”) from a date. For full documentation see our date formatting guide.

  1. This is a footnote! 

New extension for Safari is here

Joining Chrome and Firefox, our new browser extension is now available for Safari. It took a little longer than we expected for approval by Apple, but we hope you’re agree the update is worth the wait!

To recap what’s new:

  • We said goodbye to the previous version’s sidebar and now things are fully integrated with the browser. This means the extension should now work on every site.
  • Capture full page screenshots for future reference!
  • Select thumbnails and images from the images available on the current page.
  • Right-click anywhere on a page to add links, images, and text to Dropmark.
  • Drag an image or link and a Dropmark dropzone will slide out from the right side of your screen. Magic!
  • Duplicate detection! We now alert you if you’re adding a link that’s already been added.

For a quick visual tour of the new extension see: https://www.dropmark.com/extension/welcome

If you previously had the Safari extension installed, it should automatically update for you. Otherwise you can click here to install.

Custom branding for teams

Dropmark aims to be your team’s visual home, and now you can personalize your home to better fit with your brand.

In addition to custom domain names, it’s now possible to upload a logo for your Dropmark team. Your logo will appear in the team switcher, collection settings, and more places to come.

When set, team logos will also be used in all outgoing emails — including team member invites, collaborator invites, and comment notifications — so you can feel comfortable communicating with clients or vendors in your space.

Custom logo in Dropmark

Set your logo by going to Team > Settings. Make sure its at least 500 x 500 pixels, fits nicely in a circle, and is either a PNG, GIF, or JPG.

Updated avatars for users too

You can also add a snazzy headshot to your personal Dropmark account. Previously we loaded avatars from the popular Gravatar service — and we’ll continue this as the default — but now you can override it with the image of your choice. If you don’t have either, we’ll fall back to your initials on a randomly colored background.

Introducing Slack integration

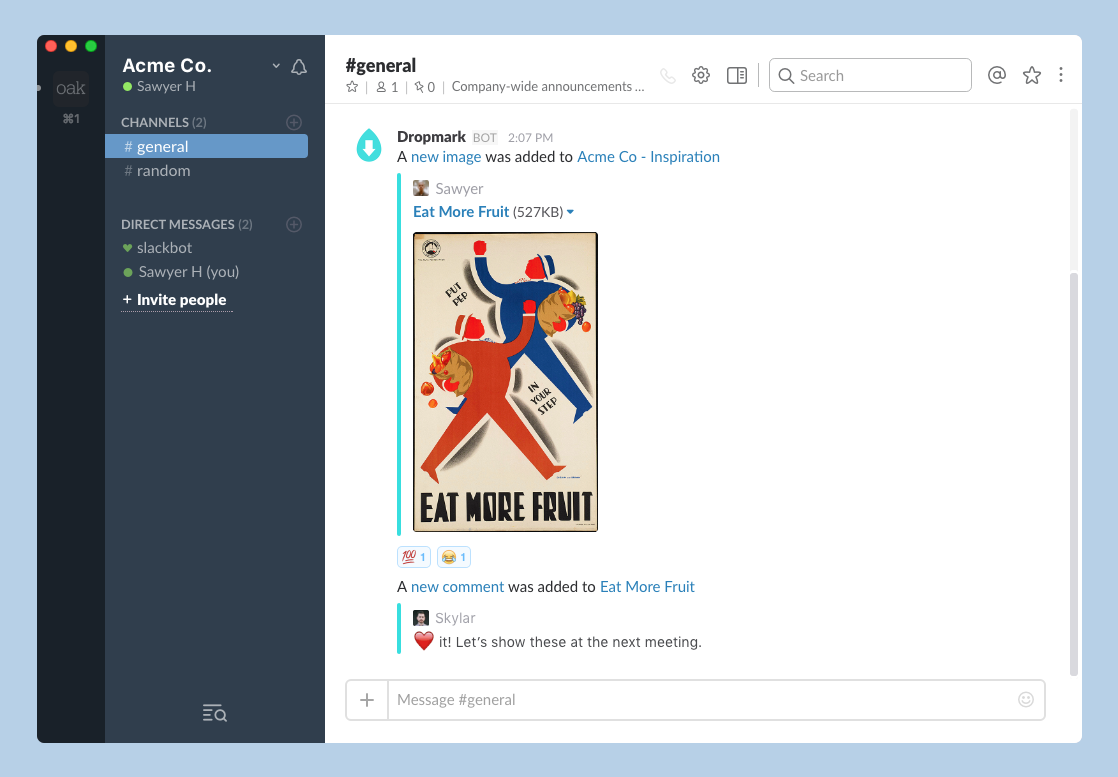
Dropmark activity in Slack

Today we’re happy to introduce Slack integration for Team collections! Now everyone can keep tabs on your team’s Dropmark activity from within Slack. When you connect your collection with a Slack channel, you’ll receive Slack notifications when a new item or comment is added in the Dropmark collection.

With Slack integration it’s now easier than ever to keep the entire team up to date with the latest progress. Design teams can quickly see when new comps are added to Dropmark and you can see when feedback is left by your teammates. Or connect your #jock-jams Slack channel and enjoy YouTube videos and Soundcloud tracks directly in Slack when someone adds them to your “Music” Dropmark collection

Connecting to Slack

Slack integration is limited to collections on a Team subscription. To connect your team’s Dropmark collection to a Slack channel, click the “Add to Slack” button in the new “Integrations” tab of the collection settings modal. Read more about how to connect a collection to Slack →

Organize colors with Dropmark

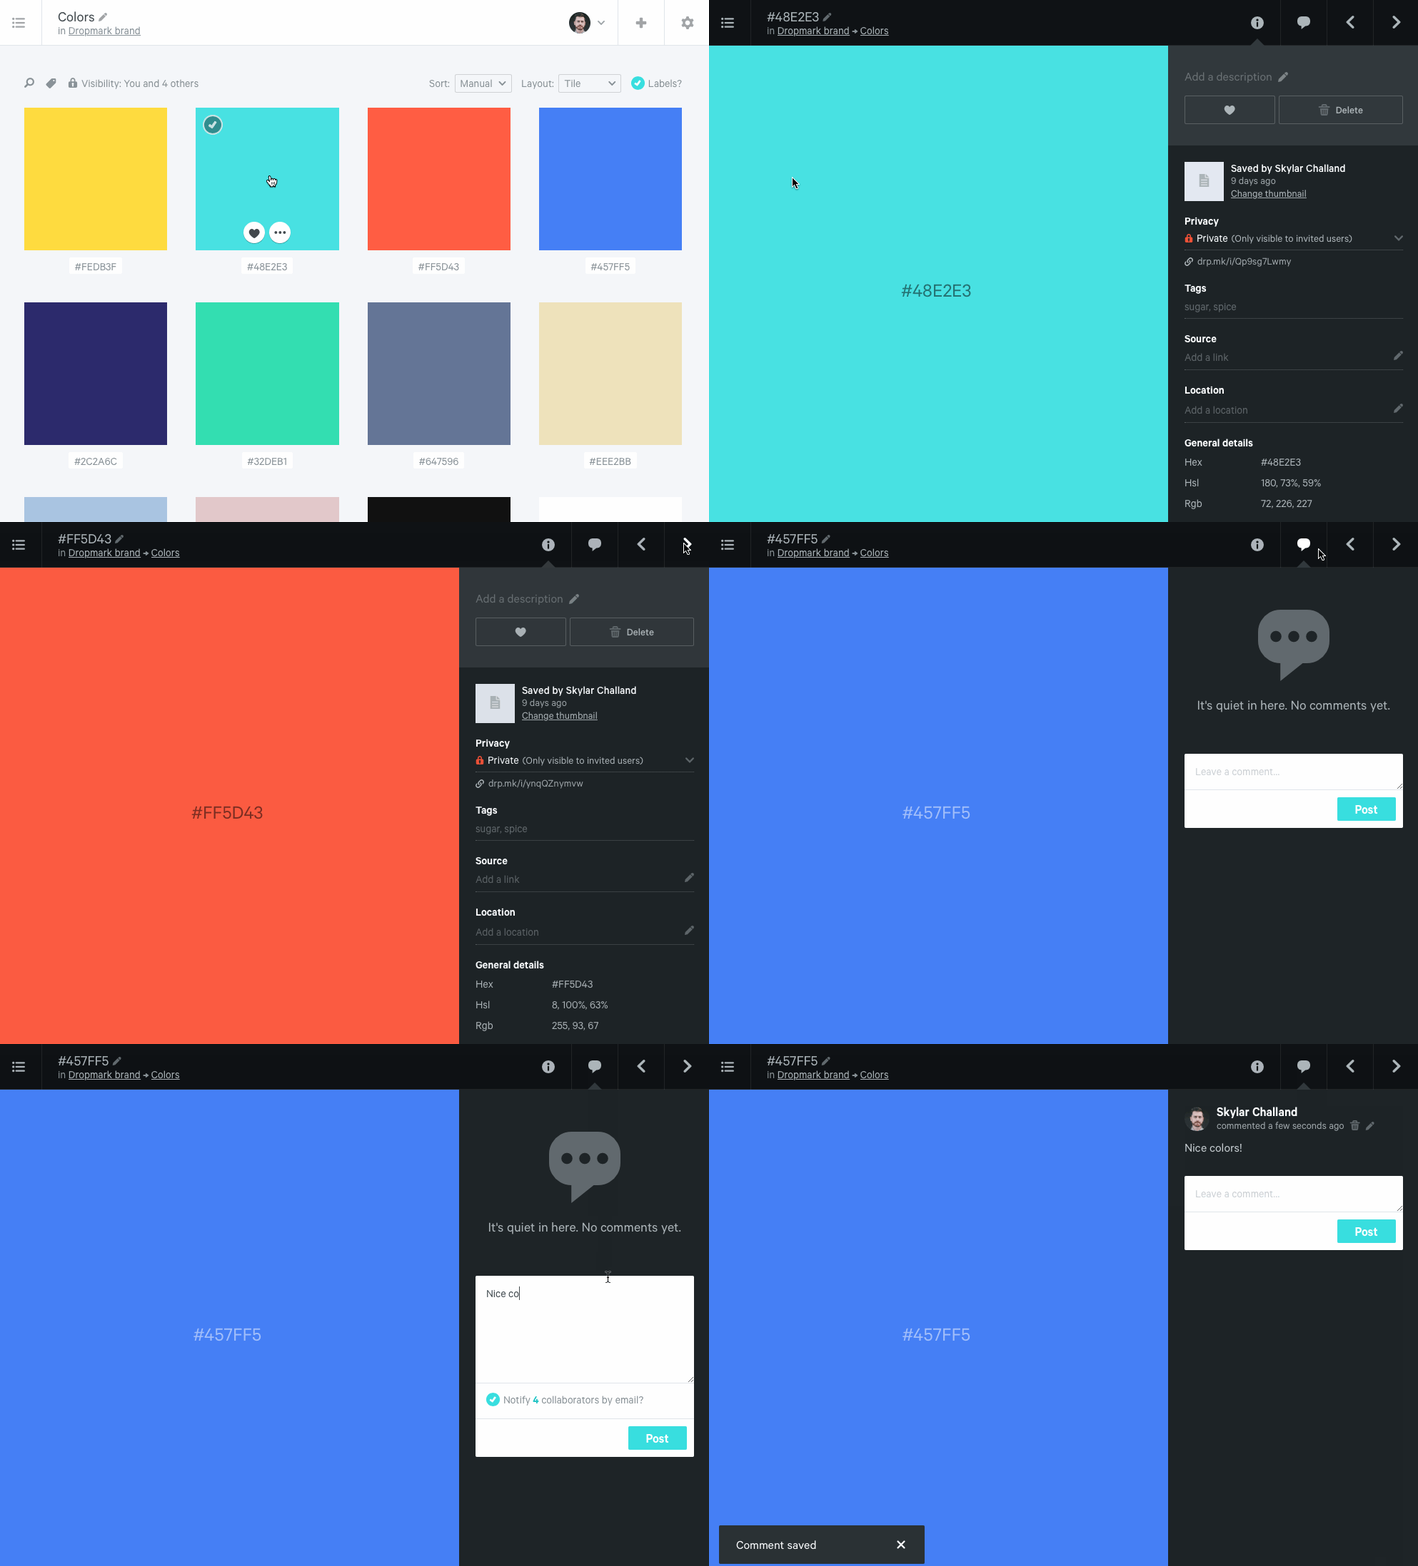
Organizing colors with Dropmark

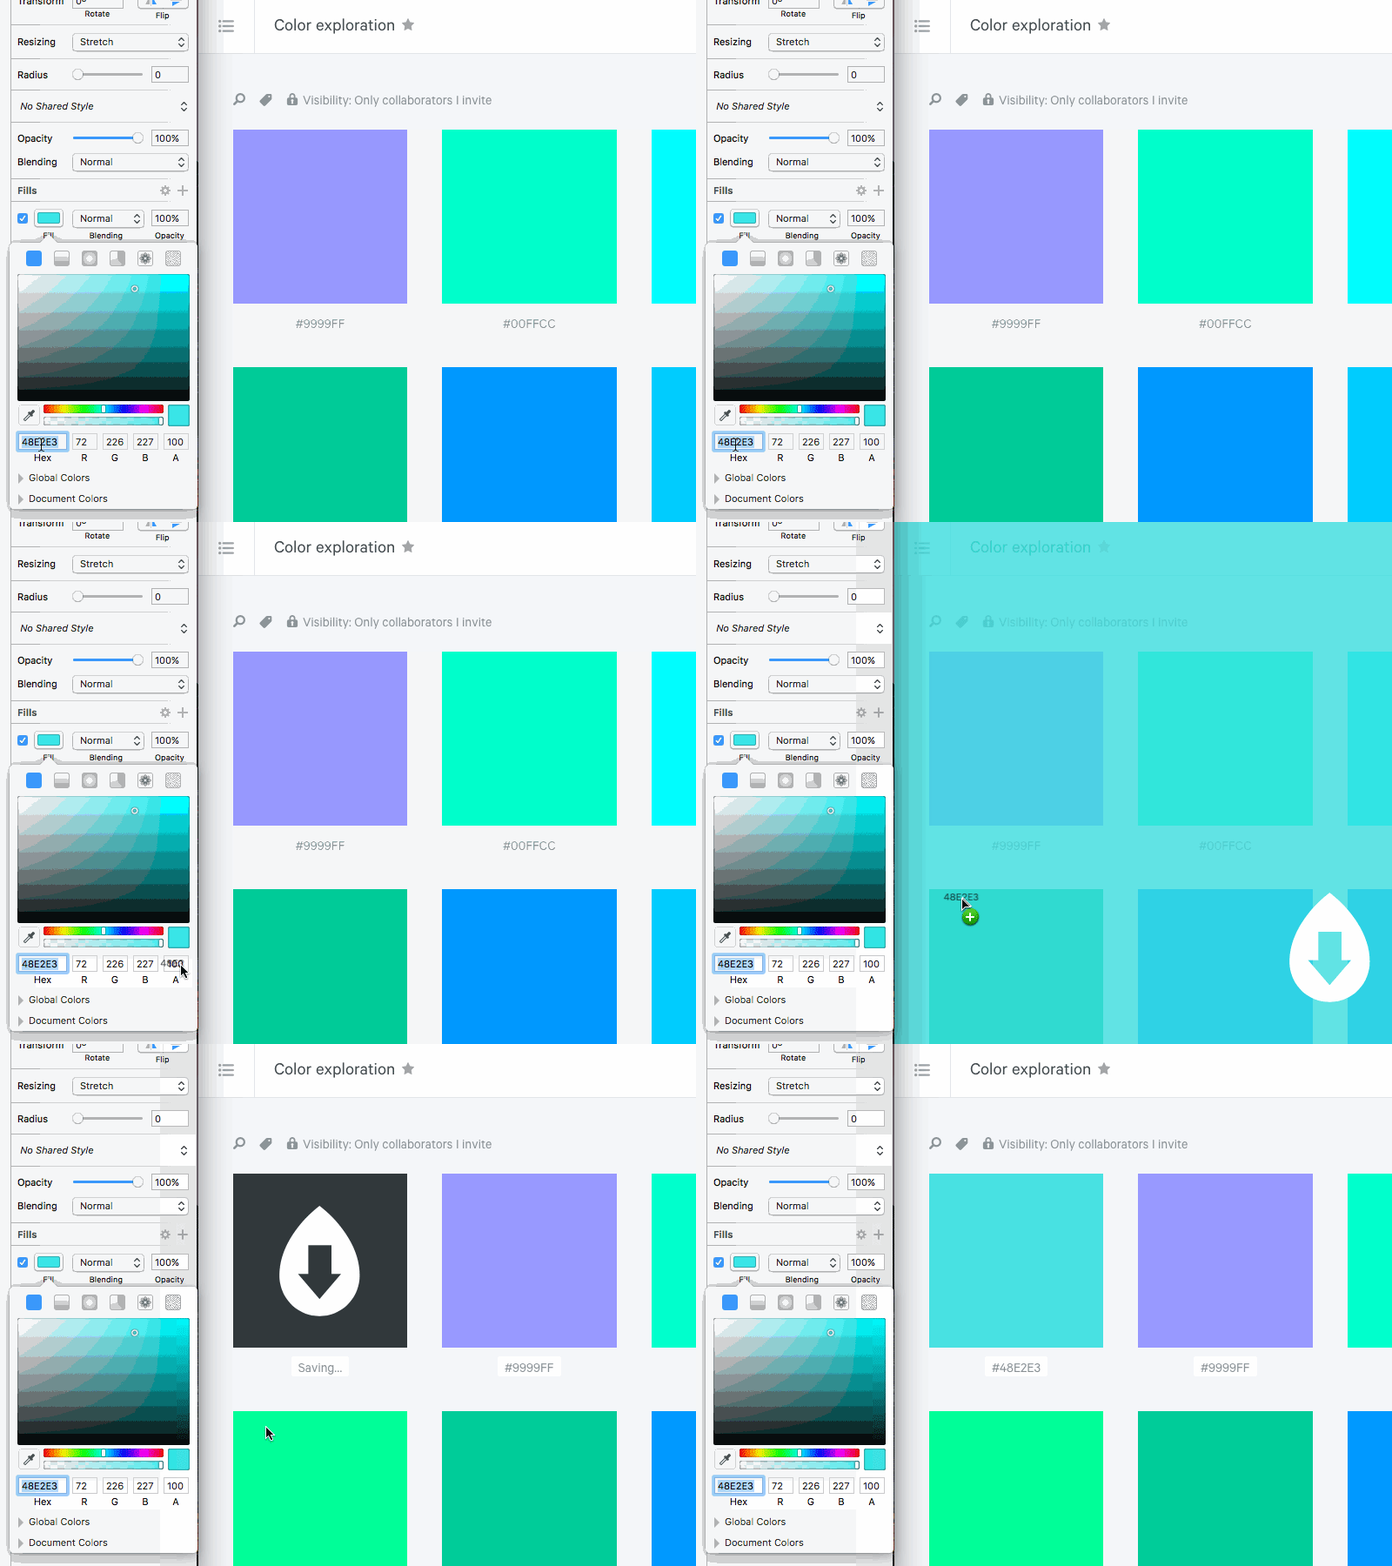
Dropmark has become a trusted tool for thousands of creatives to organize image assets, notes, links, media, and files. Today we’re introducing a brand new type of items to the mix: Colors!

Use Dropmark to collect, organize, and create color palettes collaboratively. Like any Dropmark item, you can drag to reorder colors, add comments, give your colors meaningful names and descriptions, and group into stacks. Work together to choose a palette for your next project, get inspired, or compile a style guide for your brand.

Dropmark will automatically generate a color palette file (ASE) designers can use in any Adobe Creative Cloud application.

Collect color samples from sites like COLOURlovers, Dribbble, or Adobe Color CC, using HEX codes like #FF0000 (red) or #000000 (black).

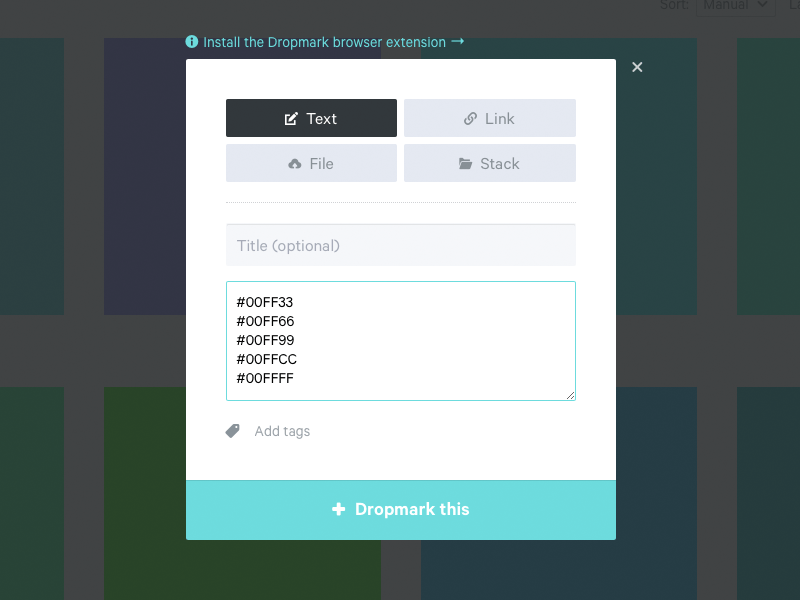
To add a color, paste one or more HEX colors (including the #) into Dropmark’s text field. To add multiple colors at once, put one color on each line.

Adding colors to Dropmark

You can also drag and drop colors to Dropmark right from your favorite design programs like Photoshop or Sketch.

Add color samples from Sketch to Dropmark

Go forth and make the world more colorful!

Copy items between collections

Copying items in Dropmark

So far this year we’ve introduced collection archives, reactions, and a new browser extension to help you better organize your items in Dropmark.

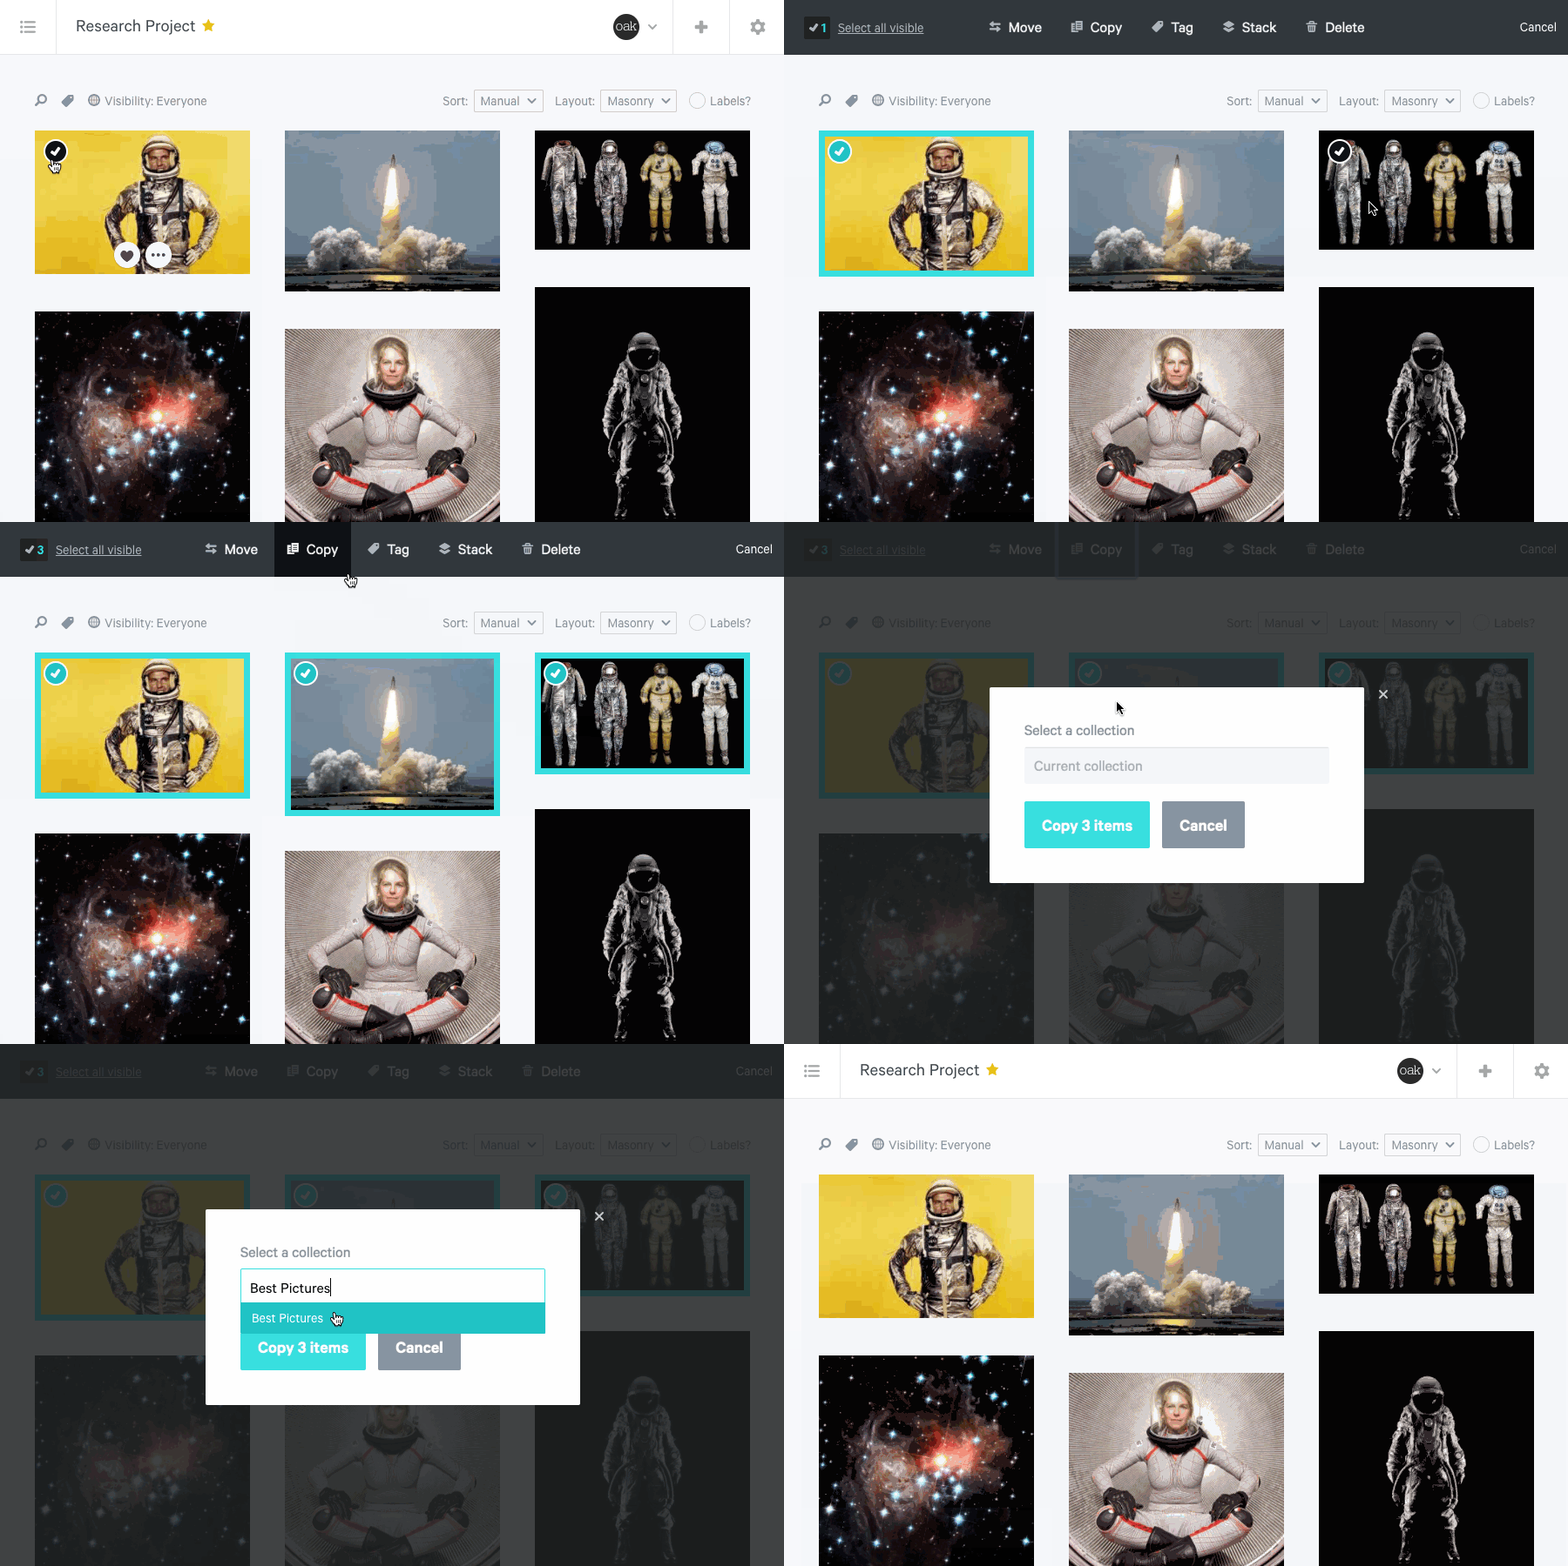
Today we’re excited to introduce another widely requested feature: the ability to copy items. You can now copy an item between collections or within the same collection. Maybe you have an image in an “Inspiration” collection that would also go well in your “Home Décor” collection, or maybe you have a text item that you’d like to duplicate to make additional revisions to. Now you can.

From your collection, select the items you’d like to copy, then click “Copy” from the bulk action menu at the top. For our Pro and Team users, you can even copy entire stacks.

Pro tip: use shift + click to select a range of items for bulk actions. Select the first item and then hold down the shift key while selecting the last item, all items in between will be selected.

Happy copying!

Save your Vine videos to Dropmark

vine-blog

If you’re a Vine user, or just a fan, then you may have heard that Vine is being “discontinued”. We’re big fans of the Vine community and want to make sure that our favorite Vines will still be around for enjoyment long after Vine-the-company sunsets. So, we did some quick work, and now when you add a Vine link to a Dropmark collection, we’ll save a copy of the video to Dropmark. This means even if the Vine.co link you added to Dropmark eventually stops working, you’ll still have a working copy of the original video.

Check out some of our favorite Vines

Designer News Podcast with Randy J. Hunt of Etsy

Dropmark is happy to sponsor this week’s episode of DN FM, the Designer News podcast.

In this episode, host Sam Solomon talks with Randy J. Hunt about software design, developing true empathy for users, holistic design, and business models. Randy, VP of Design at Etsy, shares what it was like helming early design projects, challenges growing the team and how Etsy’s mission attracts the calibre of designers it does.

The episode also starts off with a panel on the state of design tools with Payam Rajabi of Shopify and Kieran Rheaume of Designer News. Discussion revolves around popular apps like Photoshop and Sketch, as well as newcomers like Figma, Subform, and Affinity Designer.

Listen above or download on iTunes or SoundCloud.

A new and improved browser extension

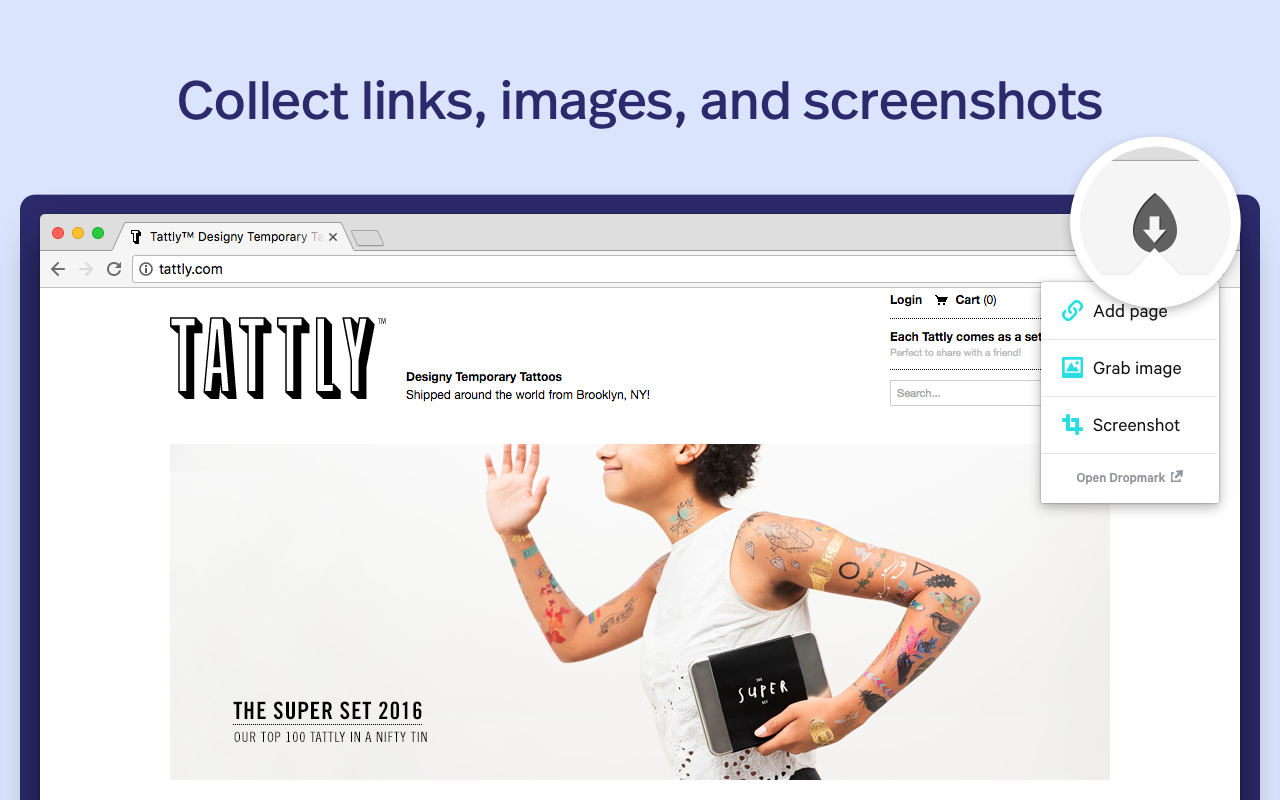
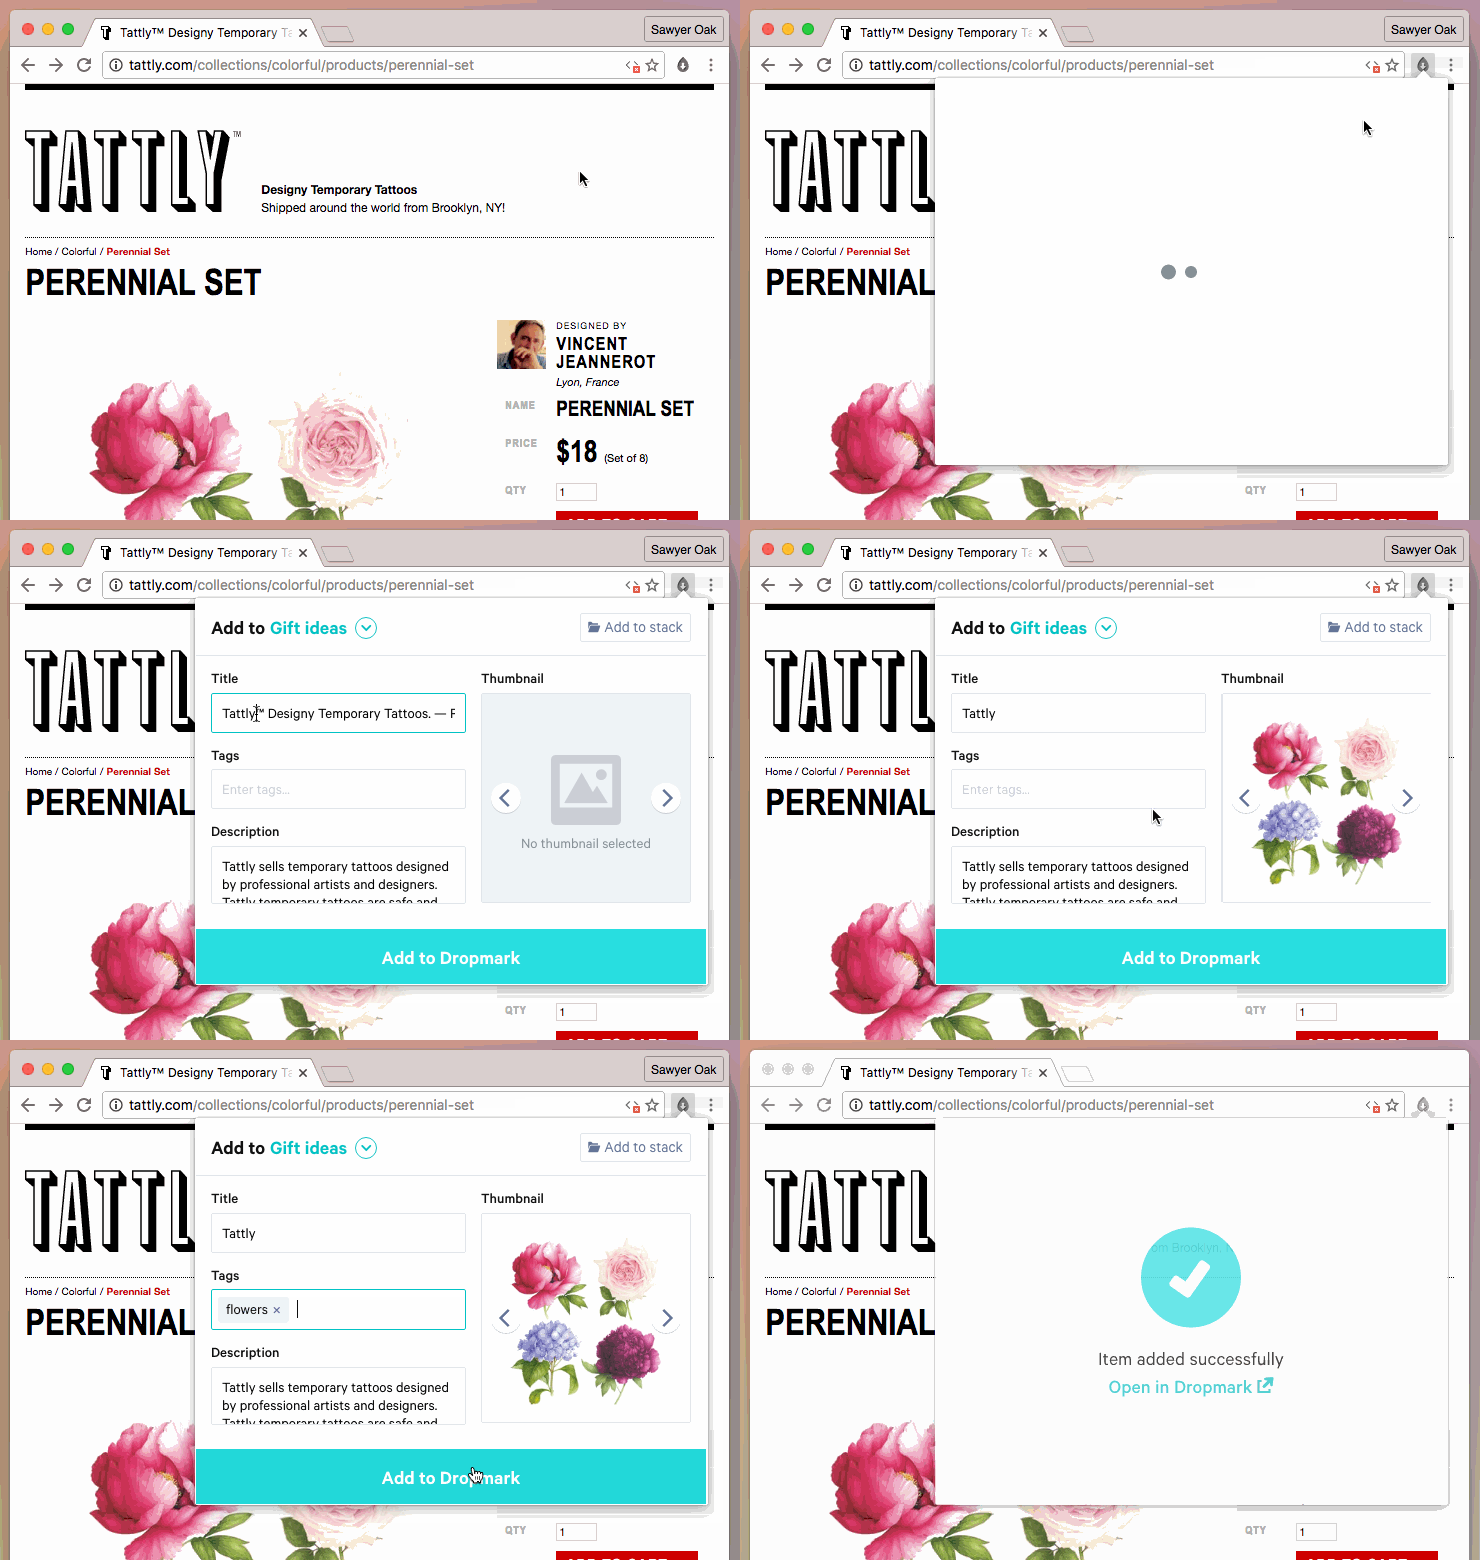
Today we’re happy to announce a totally revamped browser extension for Chrome and Firefox users. The new “Add to Dropmark” extension is the quickest way to add links, images, and full page screenshots to your Dropmark collections straight from your favorite web browser.

Here’s a quick preview:

Chrome extension demo

Some new things you’ll notice:

  • We said goodbye to the previous version’s sidebar and now things are fully integrated with the browser. This means the extension should now work on every site.
  • Capture full page screenshots for future reference!
  • Select thumbnails and images from the images available on the current page.
  • Right-click anywhere on a page to add links, images, and text to Dropmark.
  • Drag an image or link and a Dropmark dropzone will slide out from the right side of your screen. Magic!
  • Duplicate detection! We now alert you if you’re adding a link that’s already been added.

How to get it:

Chrome users: If you have the extension installed already, then you’re all set! The extension will automatically update. If you don’t have the extension installed yet, head over to the Chrome Web Store to install it.

Firefox users: Visit this Firefox Add-ons page to install the extension.

Safari usersWe’ll be releasing the new extension for Safari when the newest version of Safari is released this Fall. Update: the Safari extension is here!

Opera users: Follow us on Twitter or stay tuned for next month’s email to hear when the extension has been approved by Opera.

CreativeMornings Podcast with David Kelley

The latest episode in the CreativeMornings Podcast features David Kelley, the legendary designer, engineer, and founder of IDEO and Stanford University’s d.school. Speaking on the theme of Freedom, David talks about the growing importance of a human-centered design approach to solving our world’ problems.

“I could’ve retired and missed this whole design renaissance thing that’s going on, but I’m glad I didn’t. It’s an exciting time. Creative people are being asked to work on really important problems, problems that matter in the world, and the good news is we’re coming up with new-to-the-world solutions, and so it’s a really good time to be a designer.”

— David Kelley

Dropmark is excited to sponsor this episode and offer listeners a special treat: get a free month of Dropmark Teams! (tune in for details)

Listen to the episode above or download on iTunes and SoundCloud.